I need to mount an SMB to one of my local machines. After a few tries and errors, I found a perfect solution.
Step 1 – Install the cifs-utils package.
sudo apt install cifs-utils
If you missed this step, you’ll end up with the following error:
mount -t cifs results in 'cannot mount readonly' error
Step 2 – Create a local mount directory
There is no absolute right or wrong directory to mount. I prefer the /mnt for most of my mounting directories. mysmb is an arbitrary folder name. You can name it whatever you want.
sudo mkdir /mnt/mysmb
Step 3 – Mount SMB
Mount the SMB to the /mnt/mysmb directory in step 2.
sudo mount -t cifs -o username=user //smb-server-address/share-name /mnt/mysmb
user: the user name of your SMB
smb-server-address: the IP address of your SMB
share-name: if you have a folder and you only want to mount that folder, you can specify it here
For example:
sudo mount -t cifs -o username=mysmbuser //10.0.1.123/myFolder /mnt/mysmb
Then you’ll get a prompt to enter the password for your user. Viola! Now you can access your SMB folder from your local at /mnt/mysmb (or whatever the local path you specified in step 2).
Ah routing! Today, I’ll attempt to explain how to do routing in Angular with simple English. You don’t need to read the whole blog post. Just pick and choose from the topics below. After getting things working, you can come back and read the rest if you want.
Please note that I didn’t include the import statement of all of the components. Please add them accordingly.
Topics:
Simple Routes – Flat routes for a few pages at the same level
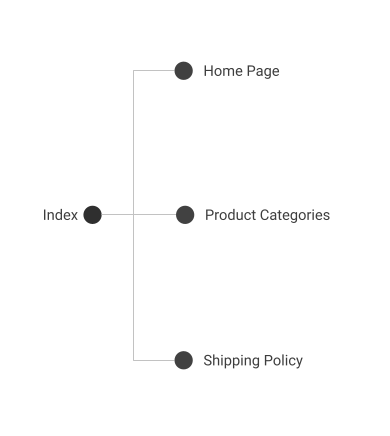
Imagine we want to create an application with only 3 pages: Home, Product Category, and Shipping Policy.
Simple one level structure
In the app.module.ts:
That’s simple. From lines 1-10, we defined all the routes in a constant object called appRoutes. As you see, the /home route is mapped to the HomeComponent, the /product-categories route is mapped to the ProductCategoriesComponent, etc. Then, we configured the RouterModule with a static method called forRoot with the appRoutes object.
2. Create a Routing Module
This step extracts the code related to routing from the AppModule to AppRoutingModule, a separate file. The whole reason for doing this is to decouple the code. It’s easier to manage route-related code and application module separately.
Create a new file for routing. You can call it whatever you like. I’m going to name it app-routing.module.ts
Don’t forget the put RouterModule in the exports array(line 21). This will re-export the RouterModule that we just configured on line 20. Any module that imports this AppRoutingModule gets access to the RouterModule.
Now we can simplify the AppModule(app.module.ts) as the following:
Much cleaner than the one in the example of Simple Routes, right?
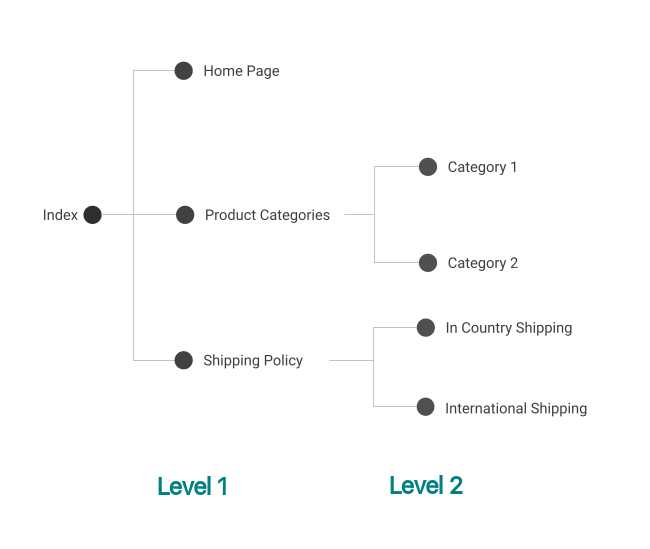
3. Nested Routes
What if now you don’t want to keep all the Product Categories on the same page? You want to add some sub-pages to the /product-categories route for different categories. Of course, you have to create new components. i.e. CategoryOneComponent and CategoryTwoComponent.
Then add them to the AppRoutingModule as the following code on lines 5 to 8. The children array indicates all the sub-route for the /product-categories route. The path of the empty string(line 6) is to set the default sub-path when the sub-path is not indicated.
Now, the ProductCategoriesComponent has to act as a placeholder for CategoryOneComponent or CategoryTwoComponent. In product-categories.component.html, we need to add the router-outlet tag. So the content can be substituted by one of the two children.
That’s how you do nested routes in Angular. I know it’s a little confusing. Leave me a message if you have a question.
As some of you might know, iPhone has its own picture file format. The HEIC(High-Efficiency Image Container) format. it doesn’t always work when you want to upload it to many websites. There are some websites out there that can convert it for you. It might be okay for some photos that you don’t care about. But for some family photos, you might not want to share them on some random websites.
I found that on Linux, you can simply install a command-line tool called heif-convert. To use it, simply install the libheif-examples command-line. heif-convert just comes with it for free. To install, run the following command:
sudo apt-get install libheif-examples
You can easily convert your HEIC file with the following command:
For example, if you have a file called IMG_1234.HEIC and want to convert it to IMG_1234.jpg, you can simply run:
heif-convert IMG_1234.HEIC IMG_1234.jpg
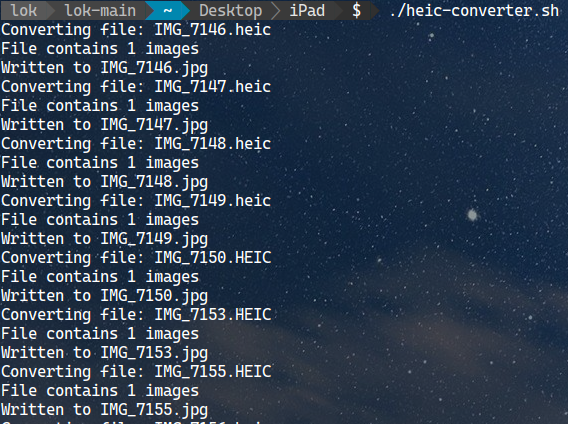
Easy, isn’t it? This command can only convert 1 file at a time, which can be annoying when you need to convert multiple files. If you’re lucky, all of the files you drag from the iPhone will have lowercase extension “heic”. You can run this script to convert them:
for file in *.heic; do heif-convert $file ${file/%.heic/.jpg}; done
Sometimes, some files are in lowercase and some come with uppercase. There are many ways to deal with this issue. You can rename all the files to lowercase and then run the above command, you can write a program that reads all the files and then run the heif-convert command.
I took the route to learn about how to do that with a bash script. My script will read all the files that contain “.heic” or “.HEIC” in the filename. Then convert them into jpg format with the heif-convert command.
I created a GitHub repository for any handy command in the future. You can download the heic-converter.sh executable from here. To run it:
The construction of a POST request in Angular is simple. But I’ve probably searched too many times on how to do it because I can memorize the syntax. It’s time to put down some notes. I’m going to go through how to add a header, create a body and add parameters to a POST request in Angular.
1. Inject HttpClient
We need the HttpClient to perform a POST request in Angular. It handles a lot of things for you so you don’t have to reinvent the wheel. To do this, simply add a private parameter in the constructor of your component or service:
constructor(private http: HttpClient)
2. Create HttpHeaders
You can simply create an HttpHeaders object. Then append header names and values to it. For example:
const headers = new HttpHeaders()
    .append(
      'Content-Type',
      'application/json'
    );
3. Create Body
Technically, you can send any data type in the body. But most of the time I would convert an object to a JSON string. You can specify the content-type in the headers.
const body=JSON.stringify(myObject);
4. Create HttpParams
You can make a POST request with multiple parameters. To do that, create a new HttpParams object and append the desired parameters to it.
const params = new HttpParams()
      .append('param1', 'some data 1')
      .append('param2', 'some data 2');
5. Make a POST request
After building the headers, body, and parameters, you can make a POST request with the following code. You don’t have to provide all the things above. For example, if your API doesn’t care about the body, you can leave it as an empty string.
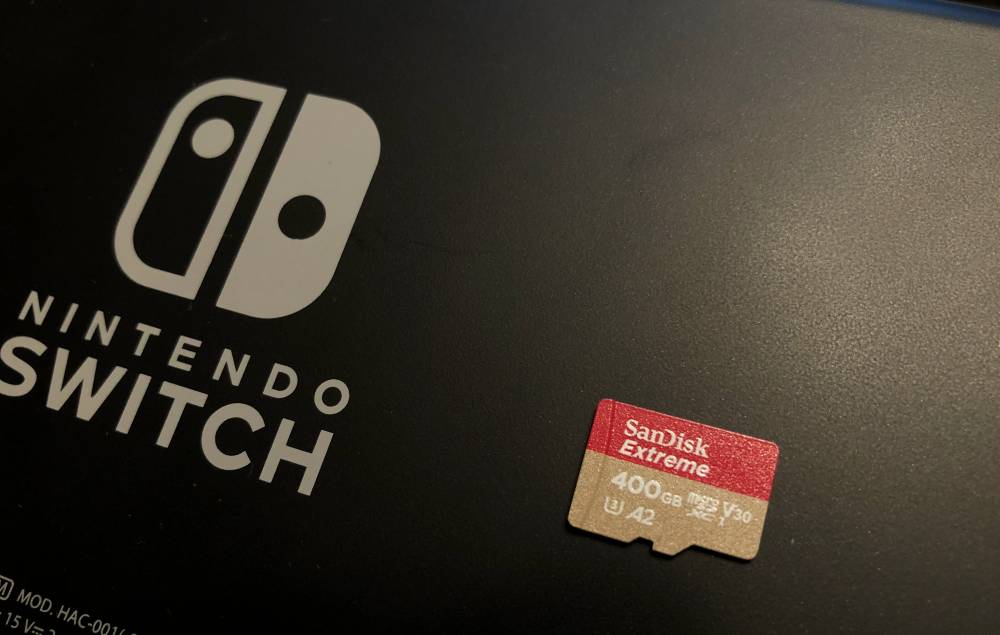
My 128GB micro SD card is at full capacity and not able to hold all of my Nintendo Switch games anymore. I bought a 400GB micro SD card with a Black Friday deal. Here’s how I clone everything to my new memory card using the dd command. The dd command is a handy tool to copy files bit by bit from one device to another.
There are only 3 steps, but I have a bonus step for you:
Find The Mounted Points
Format the Micro SD Card
Copy The Entire Card
Bonus: Check dd Progress
1. Find The Mounted Points
Mount both memory cards to your computer. Then, run the following command to list all of the mounted drives:
df -h
df is a great command that reports file system disk space usage. The -h flag means to print the output in a human-readable format.
I hid the unrelated stuff, the last 2 rows are what I see from my machine
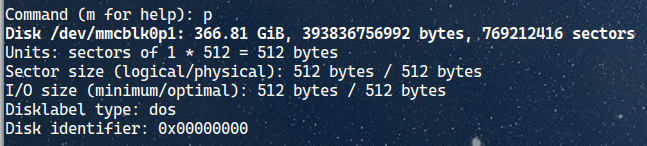
From the output, I can tell that my 128GB micro SD card is mounted to “/dev/sdc1” in my file system. The new 400GB micro SD card is mounted on “/dev/mmcblk0p1”. The reason why it’s not showing the exact capacity is that I’m using the ext4 filesystem. It reserves 5% of the capacity for important root processes. Here’s an explanation I found on the StackExchange website.
2. Format the Micro SD Card
Since this is a new memory card, we need to format it. There is an easy way to do that with a GUI application called Disks on Linux Mint or any Ubuntu distro. This step is for educational purposes only. Skip this if you don’t want to go through the hassle of the command line.
Nintendo Switch uses FAT32 format. So be it. As we know from step 1, the new SD card is mounted on “/dev/mmcblk0p1”. We need to unmount it first.
sudo umount [path-of-your-new-memory-card]
Remember to change [path-of-your-new-memory-card] to the one you found at your machine in step 1. Below is mine:
sudo umount /dev/mmcblk0p1
Next, we have to create a new partition. I’m assuming you know the path to your memory card from this point. I’m going to use [path-of-your-new-memory-card] instead of my own path.
sudo fdisk [path-of-your-new-memory-card]
You will enter the interface of the fdisk command. It looks like this:
fdisk interface
Type the letter P and hit enter. You will see the information on the partition table of your memory card. Mine looks like this:
Partition table information
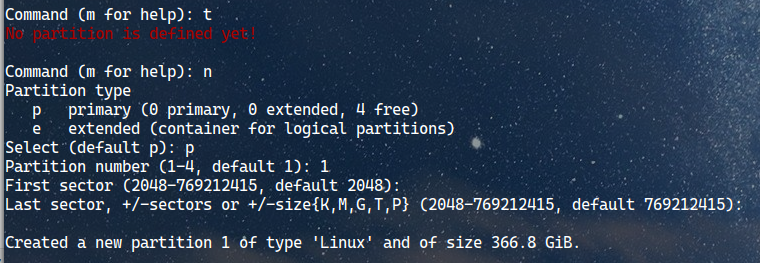
Type the letter T and hit enter. You will see the text “No partition is defined yet!”.
Then type the letter N and hit enter. This is the command to create a new partition. Next, type the letter P to select the primary partition type or simply hit enter to select the default.
We only want to create one partition, so type the number 1 or just hit enter to select 1 by default. For the first sector and last sector, also just hit enter to select the default option.
Successfully created 1 new partition on the memory card
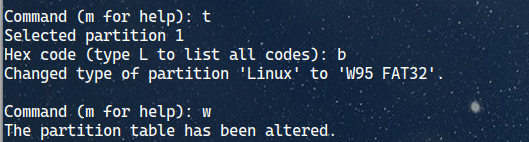
Last but not least, we need to change to partition type to FAT32. Type the letter T again and hit enter. Select partition 1, which is the one we just created. Then type the letter b to select “W95 FAT32” format. If you want to explore more options, type the letter L, and hit enter.
After that, type the letter W to save the changes.
All the above are to prepare us for formating. Now we have to actually format the memory card. Use the following command to format the memory card. And your memory card will be usable. 😁
sudo mkfs.vfat [path-of-your-new-memory-card]
Now we have successfully formatted the memory card
3. Copy The Entire Card
This step is simple. Basically, you just run the following command:
[origin-of-your-file] is the path that you need to replace with the original micro SD card in your system. [destination-path] is the path of the new card. bs is how many bytes dd command should read and write at a time. The default is 512 bytes. I changed it to 4M, it means 4 megabytes. It’s the same if you just do 4096(without the letter M at the end).
Now, just sit back and relax until it finished. The same method can be used to create a bootable Linux image using a micro SD card or USB flash drive. You got the idea.
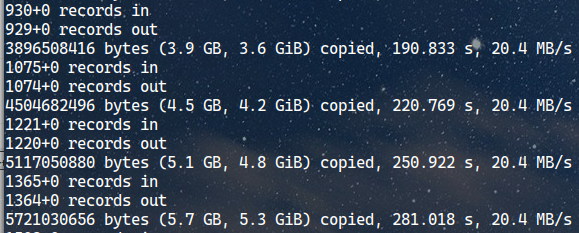
4. Bonus: Check dd Progress
If you forgot to type in “status=progress” in the dd command like me, you can check the status by opening a new terminal instance. Then type in the following command:
sudo kill -USR1 $(pgrep ^dd)
This will display the progress of the dd command in the original terminal.
It shows 3.2 GB of data is copied after 155 seconds at 20.4 MB/s
If you want to display the progress every n seconds, try the following command:
Replace [number-of-second] with a number. Say you replaced it with 30, then the terminal will display the progress every 30 seconds. See my example below:
watch -n30 'sudo kill -USR1 $(pgrep ^dd)'
This is displayed every 30 seconds in the original window
To stop watching, simply use Ctrl + C in the second terminal. Make sure you do NOT do that in the original terminal that’s running your dd command. Otherwise, you will have to start over again.
Today, we have only touched on the basics of the dd command. Let me know if you have any suggestions.
Recently, I tumbled into a YouTube video of a documentary of a New York Times journalist who got hacked in a hacker conference. The result was mind-blowing. He got a password added to his phone account. His computer got hacked and all of his bank accounts are compromised. It’s entertaining to watch, but it doesn’t sound fun if that happens to me and you. That video got me interested in learning about network security. I’m going to put down some notes with some basics.
TCP connection
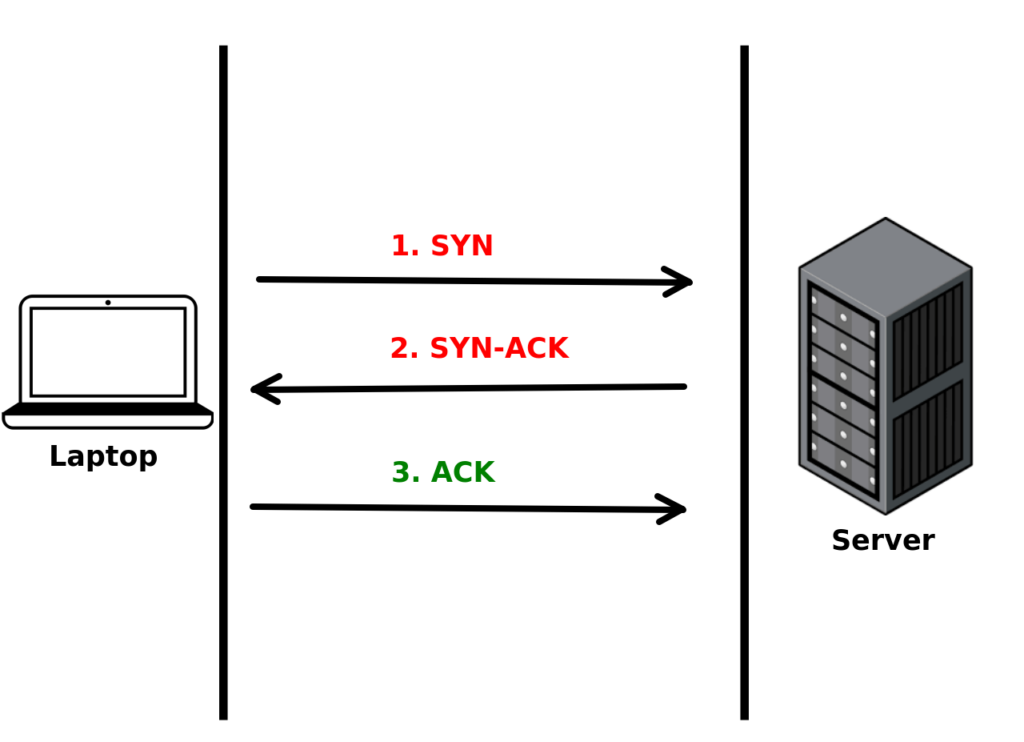
Transmission Control Protocol(TCP) is the foundation of communication between two computers on the internet. A TCP connection starts with a three-way handshake between two computers.
For example, when we want to browse lokarithm.com from a laptop computer. Here’s what happens behind the scene of the browser. When we hit ENTER after typing the URL(i.e. lokarithm.com) in the address bar, the URL will be sent to the Domain Name System(DNS) server using User Datagram Protocol(UDP) on port 53. Then the DNS will find the IP address of lokarithm.com and send it back to the browser. Now the browser knows where to visit. It will start a three-way handshake process with the server to establish a TCP connection.
The three-way handshake of a TCP connection
The Three-way Handshake
The browser sends a TCP segment with an SYN(Synchronize Sequence Number) flag set to 1. Basically it’s saying “hi” to the server and see if something is there. That’s the first handshake.
When the server sees the TCP segment, it replies with a TCP segment where the SYN and ACK(Acknowledgment Number) flags are both set to 1. The server simply just waves back to us and says “oh hey, I’m here”. That’s the second handshake.
Now we know that the server can hear us. But the server doesn’t know that we can hear her yet. So the browser will send a TCP segment with ACK flag set to 1 back to the server. Now, the server knows we could hear her. That’s the third handshake. Then, the two machines can start talking to each other.
HTTP vs HTTPs
HTTP stands for Hypertext Transfer Protocol. It’s a protocol to transfer data between computers over the internet. It sits on top of the TCP/IP protocol. Basically transfer data in plain text.
Hypertext Transfer Protocol Secure(HTTPS) on the other hand, is an extension of the HTTP. HTTPS encrypted data with Transport Layer Security (TLS). After establishing the TCP, HTTPS has a few additional steps to make sure the transaction of data is secure. Then the data transfer in between will be encrypted with a session key generated by your browser. Data transferred by HTTPS ensure that even if someone intercepted your data, they cannot see the message unless they have the session key. To understand how HTTPS works we also need to understand the concept of private key and public key.
Private Key and Public Key
Private Key is a bunch of randomly generated characters that can be used to decrypt messages. Public Key is also a bunch of randomly generated characters created with the private key. Public Key can be used to encrypt a message that can only be decrypted by the private key.
Encryption and Decryption
To simplify this concept, imagine I am using my method to encrypt a message “hello” by substituting each character with 1 character after it. For example, if the character is “a”, I will substitute it with the character “b”; “g” will be replaced by “h”; “z” will go back to “a”. So, the word “hello” will become “ifmmp”. I don’t share my secret method of encrypting the message. This secret is similar to a private key.
Now, you are given this message “ifmmp” and you don’t know what it means. But I gave you a box which when you throw in the message that I give you, it will decrypt the message for you. And you will see the actual message, i.e. “hello”. I can give a box like that to anyone who I want them to see my secret message. The box serves the exact purpose of a public key.
Public-key cryptography
In Addition, in an asymmetric encryption key pair, the private key can encrypt a message that only the public key can decrypt. For example, Alice signed a message with her private key. Then anyone who has Alice’s public key can decrypt that message. Therefore, anyone who has Alice’s public key can verify that a message is indeed signed(encrypted) by Alice. Because she is assumingly the only one that knows the private key. Note that you should keep the private key private and not sharing it with anyone.
That’s how private key and public key work. The actual encryption process is more complicated, but you got the idea.
The HTTPS magic
Now, imagine you’re visiting lokarithm.com this time via HTTPS. After establishing a TCP connection, a TLS handshake will happen before the data transfer occurs. Here’s what happens:
The browser will initiate the handshake with a “hello” message. The message includes which TLS version the client supports, the cipher suites supported, and a string of random bytes known as the “client random“.
The server will present two things to your browser: A TLS certificate, a digital certificate signed by a Certificate Authority(CA), to your browser. A “server random,” another random string of bytes that’s generated by the server. It’s basically telling your browser “I’m the real lokarithm.com. Here’s my ID issued by the Certificate Authority. You may verify that.”
The browser has a list of trusted CAs when it’s installed. It knows the public keys of those CAs. So it will decrypt the certificate and see whether it’s a valid certificate. The browser will confirm the server is who it says it is.
Then the browser sends one other random string of bytes called a “premaster secret” to the server. The premaster secret is encrypted with the server’s public key and can only be decrypted with the private key of the server. (The client gets the public key from the server’s TLS certificate).
The server decrypts the premaster secret.
At this point, the browser and the server both have the “client random”, “server random” and the “premaster secret”. Both sides use those three pieces of information to generate a “session key“. The session key is only valid throughout the connection session.
The browser sends a “finished” message that is encrypted with a session key.
The server sends a “finished” message encrypted with a session key.
The TLS handshake is completed. The communication will encrypt all the data using the session key.
That’s a lot of handshakes. Actually, there is a different way of handshake called an ephemeral Diffie-Hellman handshake. The rabbit hole is deep. Let’s talk next time.
Recently I’ve been through a transition from Windows 10 to Linux. Here are a few things that I want to share.
Why Am I Switching?
I have two personal laptops at home. A primary one as a daily driver and an older one is basically sitting there doing nothing. I haven’t directly interacted with the Linux operating system ever since I graduated from college. Since Microsoft has made .Net Core open-sourced and available on basically all operating systems, I’ve always wanted to explore developing .Net applications in Linux(Because it’s cheaper to host web applications on Linux than Windows🤐).
Also for some reason, I’ve been seeing a lot of Linux-related YouTube video recommendations lately, which scratched my itch for learning.
After watching a few videos, I decided to join a few Linux subreddits to learn more. Linux distributions nowadays are very easy to install because they usually come with user-friendly GUIs(Graphics User Interface).
Plus, Linux operating systems are generally more stable and customize-able than Windows. I like the idea that you can make it very personalized and easy to use for your own purpose.
My Concerns
I worried about a few things before switching to Linux. Most people are worried that they cannot play games on Linux. First of all, I have to point out that this is not a big problem anymore. Because many popular games such as Minecraft, Dota 2, Team Fortress 2, Counter-Strike: Global Offensive(and many more) do have Linux versions. I don’t play many games anymore, that’s not my main concern.
I do use Microsoft Office occasionally. I had a formatting issue with LibreOffice before. I’m afraid that I might not be able to get the same experience on Linux. But it turns out that it’s not a big issue anymore.
Other than that, most of my frequently used software, such as Visual Studio Code and Chrome, do have Linux support. Or there are good alternatives. For example, I use an open-sourced remote desktop software called mRemoteNG(highly recommended if you’re on Windows by the way). There are several alternatives on Linux. I ended up with Remmina.
My Manjaro Experience
I started out installing Manjaro on my old laptop. Manjaro is an Arch Linux-based operating system. Arch Linux uses a rolling release model. Instead of having major releases every 6 months or so like other Linux distros(distro means distribution), there are frequent updates released on a weekly or even daily basis. A benefit of that is, you’ll always get the most cutting-edge updates. For example, if there is a security update, you’ll get it right away. Another feature of Arch Linux is that it’s minimalist. You only get the most essential software plus whatever you want to install.
The flip side for Arch Linux is that nothing comes right out of the box and the installation can be confusing for newbies. Manjaro solves this issue. It walks you through a few easy steps and gives you a good-looking user interface.
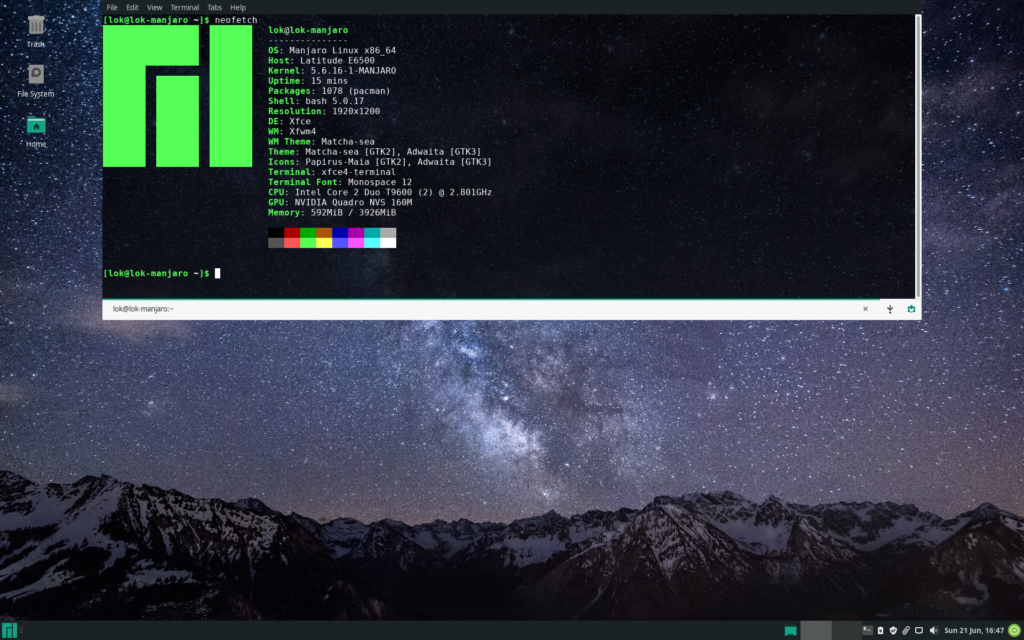
So I started with Manjaro XFCE(one of the desktop environment choices for Manjaro). Note that on Linux, you can customize many things. The desktop GUI is one of the many things that you can customize.
A screenshot of Manjaro on my Core 2 Duo laptop😂
The XFCE desktop environment is beautiful right out of the box. It’s easy to use and I don’t have to go through the complex Arch Linux installation process. On top of that, you can even install custom software from the AUR(Arch User Repository, a repository maintained by the Arch Linux community). I really liked Manjaro after using it for a week or so.
After a week, my daily driver, which was running Windows 10 had some issues. Then I decided to install Manjaro on it too(YOLO). I’ve been through a few software packages updates. There were some problems here and there and I managed to fix them.
Until one day, I’m not able to boot to the desktop because I delayed an update for a few days, and the latest update broke it. That was the moment I felt tired of keep having to fix issues after the updates. I realized that an Arch-based Linux system is not for me. At least not for daily use. It’s good for people who have more experience with Linux and are willing to spend time fixing issues after each update. I don’t have time for that.
I want a stable environment that works and doesn’t require me to maintain it frequently. So I decided to switch to a relatively more stable distro, Linux Mint.
My Linux Mint Experience
My daily driver machine with Linux Mint
Linux Mint is based on Debian and Ubuntu. It’s relatively stable because Linux Mint comes with Long Term Support and does not require frequent updates. It doesn’t come with the most cutting-edge software like Manjaro. But I’m happy with Linux Mint as my daily driver because I don’t need to worry about breaking it after every update. It just gives me peace of mind.
I kept my older laptop with Manjaro because I still like to explore more of it.
Conclusion
I ended up installing Linux Mint as my daily driver and Manjaro on my older laptop. I’m happy with the result and I’ll keep posting anything I learn.
Many people talk about Docker these days. But most of them are hard to understand because people made it sounds too complicated. Today, I want to explain what Docker is in a simple way. Then I’m going to expand into why we should use it, and what are the use cases.
Docker in One Sentence
Docker is a technology that lets you quarantine an application in a tiny version of a Linux virtual machine and runs your applications.
Why You Should Use Docker?
Code Runs The Same in All Environments
Remember the last time when your code works at your local machine but doesn’t work when it’s deployed to the server? By using Docker, this kind of moment will become history. You can put all your applications with the dependency configured in one package(a.k.a. a Docker image). No matter what environment you’re running your application, all the dependents will be created exactly the same. There will be no more “it works at my local but doesn’t work on the server” moments. Isn’t it awesome?
Docker is Really Fast
Imagine you need to setup a virtual machine, how long does it really take? An hour? Thirty minutes? Docker can do that within seconds. Yeah, you heard me rights. Not minutes, but seconds!
For example, if you want to create a Debian Buster environment. Your only need to run two commands. One to download the Debian Docker image to your machine. This part only needs to be done once. Next, run that image with Docker. Just within a few seconds, you can have a fully functional Debian system running. Check out the following video.
Here’s an example of me running an instance of the Debian container from Ubuntu
Did you see how fast it is?
Code Quarantines
That’s right. Your code is quarantined inside a Docker container(I will explain what is a Docker image below). That means you can run an application using Node.js 14.2.0, a different application on 12.12.0, and another one on (if you really want)8.17.0, all in the same machine! The best part is, they won’t affect each other.
Potentially Saves Money
Back in the day, when we need different environments we need to create a new physical server and set up the OS. Now you can install multiple virtual machines with different OS in them. Docker is similar to a virtual machine. But with fewer overheads. Because Docker containers share the same resources, such as the Linux kernel. In the example of running multiple applications with different dependent versions of a framework, you don’t need to buy another virtual machine. Instead, you can put everything in the same virtual machine and run your application via Docker. If you have 10 virtual machines running 10 different environments, you can now do all of that in one machine. Of course, if your applications need to process a lot of data you’ll still need a different machine. But you got the idea.
So, what is Docker really?
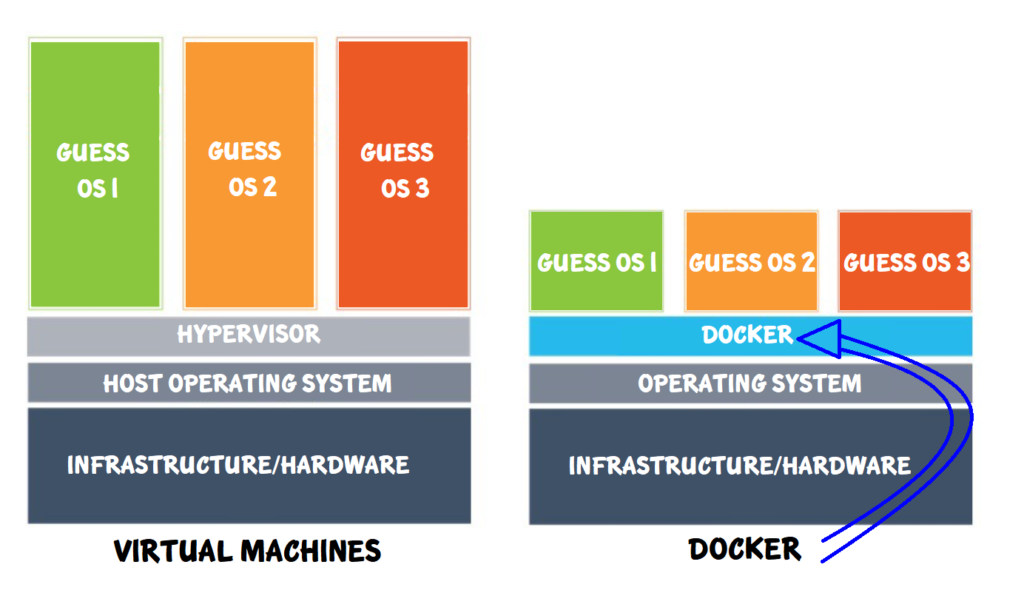
Difference between virtual machines and Docker
Just like most computer applications, Docker runs on top of an operating system. We called this “Docker application” Docker. It mediates between the operating system and the tiny version of operating systems that runs on it. The difference between a virtual machine and Docker is that a virtual machine emulates the infrastructure of a computer. For example, CPU, memory, hard disk, etc. When we install an operating system on a virtual machine, it emulates the whole thing.
On the other hand, Docker runs on the Linux operating system. It shares what’s already running on the operating system and shares the resources with the tiny operating systems (Docker containers) that are run on top of it. For example, if your operating system is Ubuntu and you want to run a Debian container. Docker will share the kernel between Ubuntu and the Debian container. Therefore, instead of installing and running the full Debian operating system, you only need a minimal bit of Debian on top of Docker. It doesn’t need to emulate the infrastructure and spin up the whole operating system again. That’s why one of the reasons Docker is so fast.
Docker Image
Now we know that Docker can run a tiny version of a Linux operating system. How does Docker know what should be in each tiny operating system? That is a Docker image. If we just want to run a tiny version of Ubuntu, we’ll still need an image of Ubuntu. That’s a Docker image.
But that’s just the basics. The best part is, you can copy files from the outside to the image and build a new image. You can even host an application and expose specific ports of the tiny Linux. Sounds familiar? Yes, it works just like any virtual machine (but without a graphics interface) and takes much fewer resources from the host operating system.
Docker Container
A Docker container is nothing but a running instance of a Docker image. You can define what goes into a Docker image. For example, an operating system, dependency packages, your application, and so on. Once you run your Docker image, Docker will create an instance of your Docker image as a Docker container.
I wanted to learn about Docker. But I don’t want to keep Docker running on my daily drive machine. It happens that I have an old Raspberry Pi 1 Model B+, which I have bought a long time ago, that just sits there doing nothing. So I decided to make it work for me.
The setup
Here’s my plan:
Install Raspberry Pi OS (previously called Raspbian) on my Raspberry Pi
Install Docker
Run Hello World Container
Remove Docker Image
Step 2 – Install Docker
Yes. I’m skipping step 1 here because there is a very detailed setup guide on Raspberry Pi’s website already. I want to focus on the installation of Docker, so I’m not going to repeat it here.
I have followed a few blog posts. Here are the most optimized steps that I found:
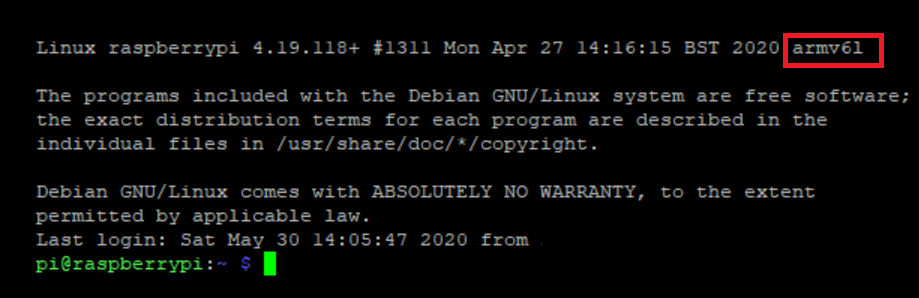
0. Login to your Raspberry Pi OS either directly log in through the terminal or remotely login by SSH. Then you should be on this screen:
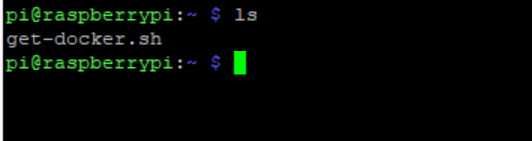
After the download step above. Check that the script is actually downloaded to your machine:
ls
You should see a file called get-docker.sh is downloaded at your current path
Okay, now we can execute the installation script as root user:
sudo sh get-docker.sh
Depending on your internet speed, this step will take a few minutes. Sometimes you would think that your Raspberry Pi is frozen. But give it a good couple of minutes. If it runs successfully, you should see the following on your screen:
4. Add a non-root user to the Docker group
sudo usermod -aG docker [your-user]
This step is to add a user to the Docker user group. If you don’t follow this step, you’ll have to run the docker command as a root user. That means you have to type “sudo” every time you run the docker command. Note that you have to replace [your-user] with your actual user name in the command. For example, my user is pi:
sudo usermod -aG docker pi
The “-a” flag is to add anyone of the group to a supplementary group. In this case, the docker group. We should only use it with the -G option. The “-G” flag is to add a supplementary group. Note that “-G” is case sensitive.
When using the “-G” flag alone, if the user is currently a member of a group that is not listed, the user will be removed from the group. This behavior can be changed via the “-a” option, which appends the user to the current supplementary group list.
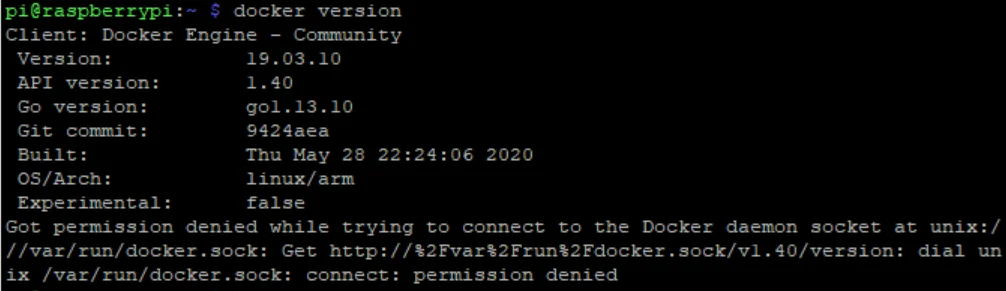
5. Check your Docker version
The purpose of this step is not just checking your docker version. It also see if your user is actually successfully added to the docker group. If it works, you shouldn’t need to run the docker command as root. i.e. “sudo”
docker version
If you see a “permission denied” message like I did, do NOT run “sudo chmod 666 /var/run/docker.sock”. This command will give read and write permission to the docker.sock file to every user in the system. As Dave H has mentioned, it will cause a security risk.
Run the following command instead:
sudo chown $USER /var/run/docker.sock
The above command changes the ownership of the docker.sock file to your user. If you run the “docker version” command now, the “permission denied” message should be gone.
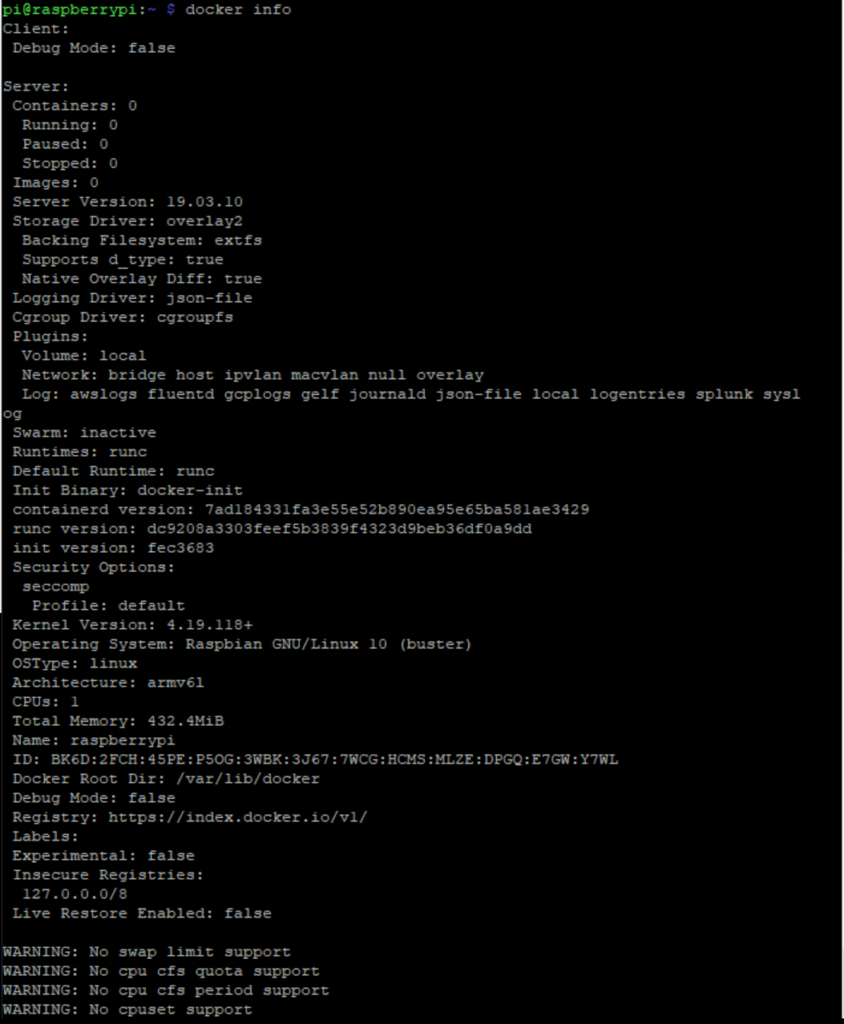
Now run the following command:
docker info
and here’s my screenshot:
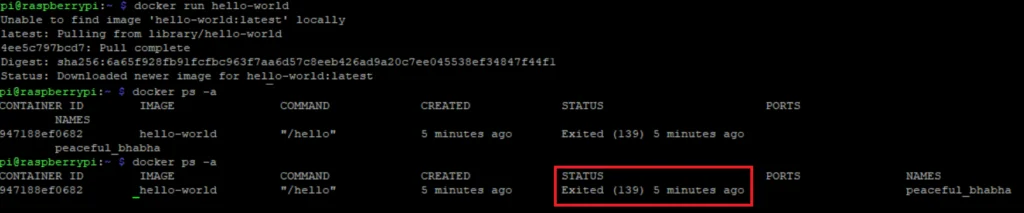
3. Run Docker Hello World container
If you have a Raspberry Pi 2 or newer, you should be able to run the following command for hello-world without any issue.
docker run hello-world
But for older Raspberry Pi, it doesn’t work anymore. My Raspberry Pi 1 Model B+ for example, doesn’t print the hello-world message like when you run hello-world in other systems. You can check the status of the current docker containers using the following command:
docker ps -a
You’ll see that the hello-world container is excited with code 139. It means the container received a segmentation fault.
After some digging on the internet. I realized that it is not the problem of my installation.
Remember in step 0 when you logged in? The message “armv6l” (the letter after the character “6” is not the number one, it’s the letter “L”) actually indicates the instruction set architecture of this particular model of Raspberry Pi. Although the regular hello-world image works in most cases, somehow the latest version of the hello-world either doesn’t support the armv6 instruction set anymore.
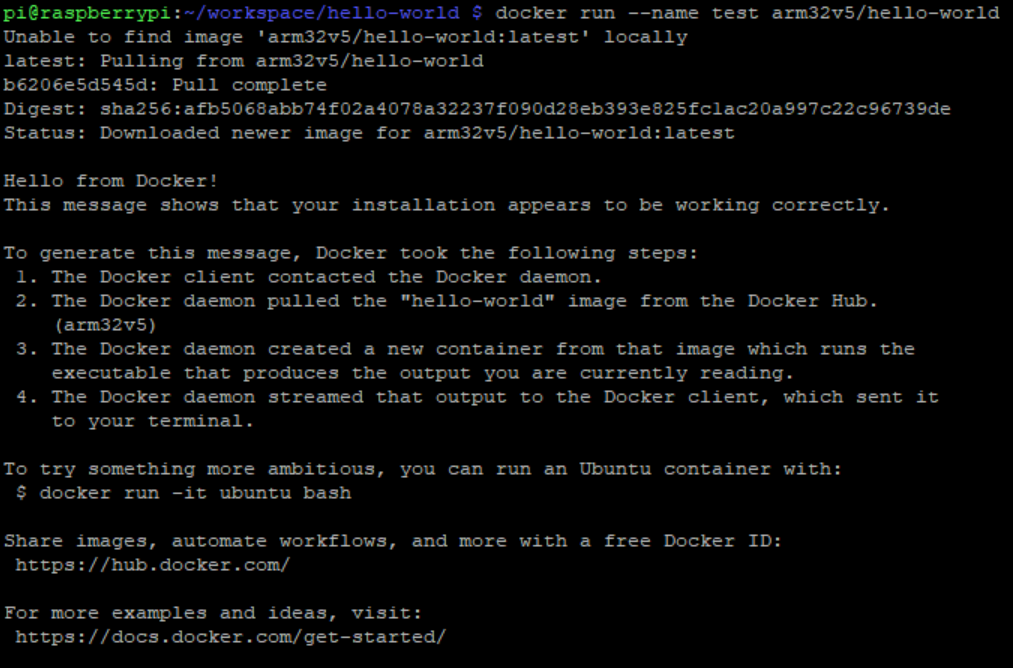
To run any docker image on Raspberry Pi OS, the image have to be built on the same architecture. Here’s the version of Hello World Docker image that works:
docker run --name [myHelloWorld] arm32v5/hello-world
[myHelloWorld] is an arbitrary name that you can give to a container. I’ve named mine as “test”. So mine was:
docker run --name test arm32v5/hello-world
Now you will see a normal Hello World message as the following:
There you go! Now you have successfully get Docker running on your old Raspberry Pi 1 Model B+!
4. Remove Docker Image
To remove a Docker image, you have to first remove the docker container. First, list all the Docker containers:
docker ps -a
You should see a list of Docker containers that have been run. Here’s one way to remove a container. To remove the Hello World container above, for example, you can run:
docker rm test
Now if you run docker ps -a again, the list will be empty.
Then, let’s list the available docker images:
docker image ls
You should see the arm32v5/hello-world image. Let’s remove it:
docker image rm arm32v5/hello-world
I’ve also created a Hello World from my Raspberry Pi. Feel free to try it out.
docker image rm lokarithm/armv6-hello-world
Additional Note
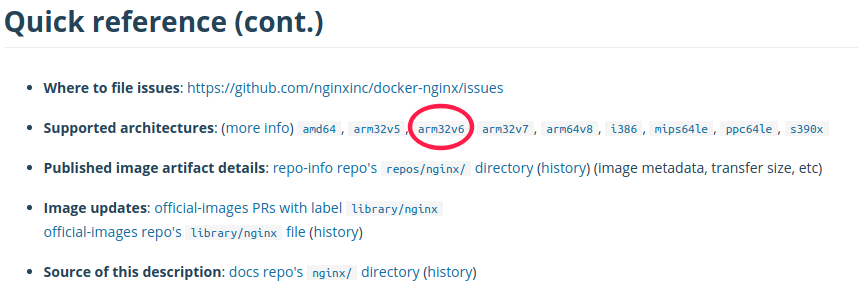
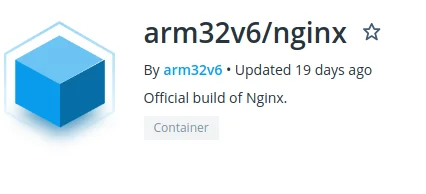
As you may have noticed, you can only run Docker images with armv6 instruction sets(or below) on Raspberry Pi 1 and Pi Zero. To find out whether an image support armv6, you can go to Dock Hub to find the image. For example, I want to run an image of Nginx. I would scroll down to the quick reference section:
Find the supported architecture “arm32v6”
From there, if you see “arm32v6” then click on the link. That means you can pull that image and use it on your Raspberry Pi 1 or Zero.
This is the image we need
In the example of Nginx, you can download the image with the following command:
docker pull arm32v6/nginx:stable-alpine
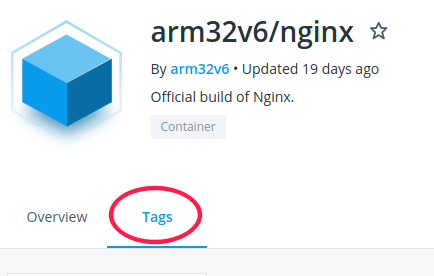
Note: Usually, if you don’t specify the version of the image, Docker will pull the latest version with a tag called “latest”. But in this case, the latest version is tagged as “stable-alpine” instead. I found the correct version by clicking the tags tab on the page. It should work if you use the same version.
Click on the “Tags” tab to list all the available versions of the image
And then run it:
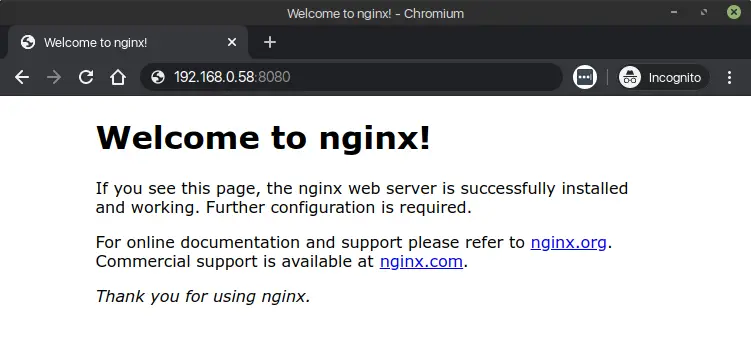
docker run -p 8080:80 arm32v6/nginx:stable-alpine
You should see messages like the above from your screen
The -p flag simply map port 8080 of the host to port 80 of the image. Now you should be able to browse the default Nginx homepage. If you’re running the command directly from the pi, simply open http://lokarithm.com:8080. If you’re like me, who SSH into the pi. You can simply use the same local IP address of your Pi to browse the site. In my case http://192.168.0.58:8080/
It’s that simple. Happy Docker-ing!
Feel free to leave me a message if you have any question.
Side note: I started this post using Putty on Windows 10 to SSH into my Raspberry Pi at the beginning. After a few weeks, I’ve switched to Linux and used Remmina for SSH. So the styling of my screenshots has changed a little.
This is a simple note to myself of how to remove Docker from Ubuntu or Raspberry Pi OS (previously called Raspbian). Credit goes to Mayur Bhandare on Stack Exchange. I also added some explanation to some of the commands so you will have a better understanding of what they’re doing.
1. Identify which Docker package have you installed
dpkg -l | grep -i docker
For example, I’ve installed docker-ce and docker-ce-cli
The dpkg command is a package management command in Debian. Just like apt-get in Ubuntu, a Linux distro based on Debian. Since Raspberry Pi OS is also a descendant of Debian, this will work just fine. The above command is basically saying, give me a list of packages that contains the word “docker” in them.
2. Remove the packages
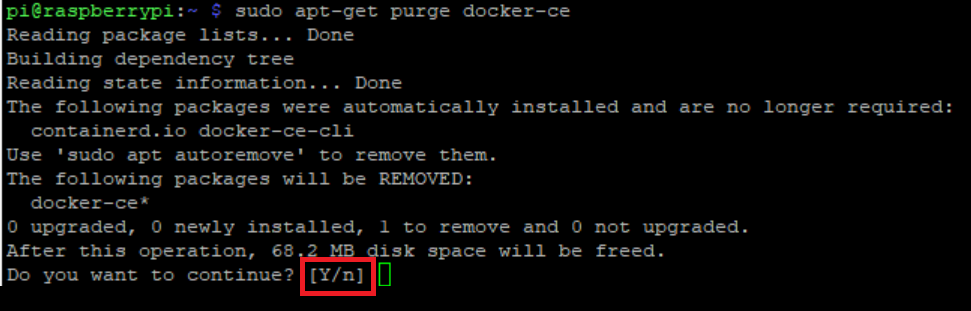
For me, I’ve only installed docker-ce and docker-ce-cli. So I will run the following commands.
The “-y” flag here is to answer “yes” to the command prompt when it asks you whether to remove a package. You can choose to remove the “-y” flag. Then you’ll see prompts like the following and you have to manually answer yes or y for every package.
3. Remove all the Docker related files
After that, you might want to remove all the Docker images, containers, volumes, and configurations. This is how:
The “-rf ” flag is a combination of the “-r” and “-f” flags. “-r” means recursive. So the rm command can remove all the children folders and files of the target folder recursively. “-f” means force. It will ignore non-existent files, and never prompt before removing them. Be careful when you use these two flags together.
The groupdel command is to delete an existing docker user group.
Bonus: Deactivate Network Interface and Ethernet Bridge
If you want to take one step further, you can deactivate the docker0 network interface and delete the docker0 ethernet bridge. Here’s how(Credit: Thanks to anony for mentioning that!😁):
To disable docker0 network interface:
sudo ifconfig docker0 down
To delete the existing docker0 ethernet bridge:
sudo ip link delete docker0
The brctl command is deprecated. Updated the above command. Credit to Nicolas Raoul and Søren (Edited on 2024-03-26)
Congratulations! You have just completely removed Docker from your system!